Diagnosis Result
Description
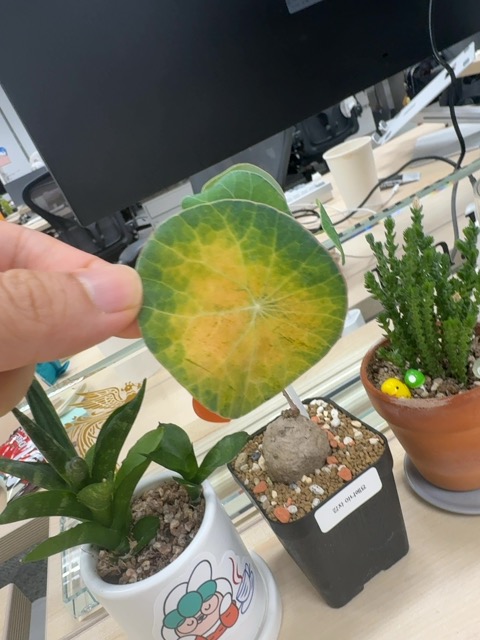
The leaf in the photo shows central to marginal yellowing with greener edges on a roundish leaf, a pattern compatible with interveinal chlorosis or general chlorosis. In potted indoor plants, such symptoms commonly arise from abiotic stress rather than a classic pathogen. Primary culprits include overwatering or poor drainage leading to root oxygen deprivation and nutrient lockout, high soil pH reducing iron availability, and occasional magnesium or micronutrient deficiencies due to depleted or imbalanced fertilizer. The presence of a compact potting mix and a perched moisture level can exacerbate these issues. Pest pressure is not evident from the image, though mild scale or mites can also cause yellowing in some cases. To distinguish among causes, inspect the roots for rot, test soil moisture and pH, review the watering schedule, and consider any recent changes in fertilization or water quality. Reversing abiotic chlorosis generally involves correcting watering practices, improving drainage, and balancing nutrients rather than applying fungicides or pesticides unless a secondary issue emerges.
Solution
1. Immediate rescue and root health restoration: - Stop watering immediately and allow the soil to dry to a comfortable moisture level before the next irrigation. Gently remove the plant from its pot to inspect the roots; healthy roots are firm, white, and odorless, while rotted roots are brown/black, mushy, and foul-smelling. If any rotten roots are found, prune them back with sterilized scissors to healthy tissue and discard the severely damaged portions. Rinse the root ball to remove soil remnants. Repot into a clean pot with excellent drainage using a fresh, well-draining mix (a blend such as 1 part potting soil, 1 part perlite or pumice, and 1 part coarse sand or orchid bark works well for many ornamentals). Choose a pot with drainage holes and avoid over-potting. After repotting, water sparingly just to settle the mix and then wait until the top 2–3 cm dry before repeating. Place the plant in a bright, indirect light location with stable temperatures around 18–24°C and moderate humidity. Do not fertilize for at least 1–2 weeks to let roots recover, then begin with a diluted, balanced fertilizer at 1/4 strength every 4–6 weeks during active growth. Monitor leaf color weekly; improvement in new growth is a good sign. If symptoms worsen or rot returns, consider a mild, targeted fungicide labeled for root health and follow label directions. Prevent future problems by ensuring the potting mix drains quickly, adding coarse material to the bottom of pots, and avoiding water in saucers after watering. Clean tools between plants to avoid cross-contamination. This approach addresses the root cause (waterlogged soil and potential root damage), supports recovery, and minimizes the risk of relapse by restoring aeration and root function. 2. Correct soil pH and iron/magnesium nutrition (addressing possible micronutrient lockout): - Many indoor plants exhibit chlorosis when soil pH is too high, which makes iron and sometimes magnesium less available to roots. Start by testing the soil pH with a home kit or soil tester. If the pH reads above 6.5–7.0, gradually lower it toward 6.0–6.5 by incorporating acidic amendments (e.g., a small amount of peat moss, pine needle mulch, or elemental sulfur according to product directions and depth). Avoid large pH swings; work in small increments and re-test after 2–4 weeks. While adjusting pH, supply iron directly to the plant as chelated iron (Fe-EDDHA or Fe-EDTA) through a soil drench or a gentle foliar spray, following the product’s label. Foliar iron sprays can provide rapid relief by delivering iron directly to photosynthetic tissues; apply during the cooler part of the day and avoid midday sun to prevent leaf burn. Additionally, magnesium deficiency can cause yellowing; apply a magnesium source such as Epsom salt (magnesium sulfate) at about 1/2 teaspoon per gallon of water and apply every 2–4 weeks as a foliar spray or root drench, ensuring you do not over-fertilize. Use a complete fertilizer that includes micronutrients in balanced proportions and avoid excessive phosphorus that can complicate iron uptake. After two to four applications, observe for color improvement in new growth, which indicates the plant is rebalancing nutrition. Throughout this process, maintain bright, indirect light and steady temperatures; avoid waterlogging and ensure consistent watering discipline. If you see ongoing chlorosis despite pH adjustments and micronutrient supplementation, consider a different primary issue (e.g., root damage, salinity buildup, or pest activity) and re-evaluate soil, irrigation, and hygiene practices. This solution focuses on correcting iron/magnesium availability that commonly underpins persistent chlorotic leaves in potted specimens, while also addressing pH-driven nutrient lockout that can mimic disease symptoms and stall recovery. 3. Long-term prevention and care plan (prevent recurrence and promote healthy growth): - Establish a sustainable watering routine tailored to the plant’s needs, pot size, and season. Use a moisture meter or monitor by finger test: stick a finger 2–3 cm into the soil; if it feels dry, water; if still moist, wait. Always water thoroughly so that excess drains from the bottom, then empty the saucer to prevent sitting moisture. Opt for a well-draining potting mix appropriate for the plant type, and consider repotting every 1–2 years to refresh aging soil and avoid compaction. Use clean, sterilized tools for pruning or pest checks to prevent introducing pathogens. Ensure the plant receives bright, indirect light for several hours daily; insufficient light can intensify chlorosis, while direct sun can scorch leaves. Maintain stable indoor temperatures and moderate humidity, avoiding cold drafts or heat spikes. Fertilize during the active growing season (spring through early fall) with a balanced, slow-release fertilizer or a diluted liquid fertilizer at the label’s recommended strength, roughly every 4–6 weeks, adjusting based on plant response. If you introduce new plants, quarantine them for a couple of weeks to prevent spreading any hidden problems. Regularly inspect for pests (scale, mealybugs, spider mites) and treat promptly if detected, using appropriate, label-approved products or organic options such as horticultural oils. By integrating these preventive practices—accurate moisture control, pH and micronutrient balance, careful fertilization, appropriate light, and good hygiene—you reduce stress on the plant, minimize nutrient lockout, and promote robust, healthy growth, which in turn reduces the likelihood of recurring chlorosis or related symptoms in the future.
Notice
The function of Plantypia is using AI, so it may be inaccurate. Please use it for fun and reference only.
Check with official pest context
Leaf spots and wilting can come from watering, temperature, or season changes as well as pests.